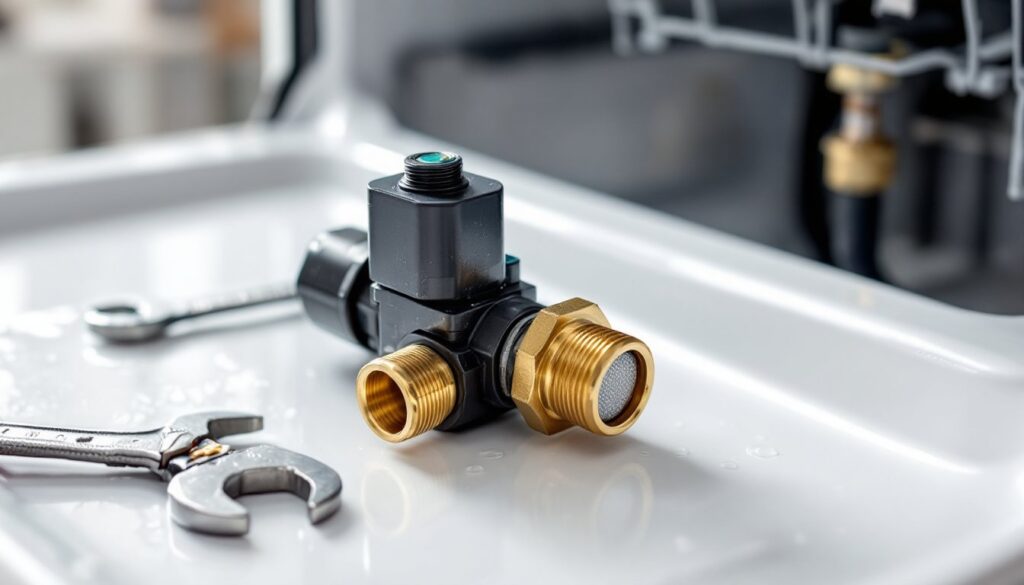
When a dishwasher won’t fill, the usual suspect is the water inlet valve, a small but critical component that controls water flow into the machine. Most homeowners assume they need a service call, but replacing this part is often a straightforward DIY job that takes under an hour and costs less than $50 in parts. This guide walks through diagnosing a faulty dishwasher inlet valve, testing it properly, and replacing it yourself with basic hand tools. No need to haul out the appliance or call a plumber, just a little mechanical know-how and confidence.
Table of Contents
ToggleKey Takeaways
- A dishwasher water inlet valve controls water flow into your machine and can be replaced in under an hour for less than $50, making it an affordable DIY repair.
- Common signs of a failing water inlet valve include no fill, slow fill, leaks underneath the dishwasher, overfilling, and humming without water flow.
- Test the valve’s power, solenoid coil resistance, and inlet screen before replacing—cleaning the screen filter may resolve slow fill issues without a full replacement.
- Replacing a dishwasher water inlet valve requires basic tools like a wrench and screwdriver; disconnect the power, water supply, and electrical harness, then install the new valve in the same orientation.
- After installation, check for leaks at both connections and run a test cycle to confirm proper fill level and operation before considering the repair complete.
- Installing an inline sediment filter on the supply line can extend the life of your next valve and reduce mineral buildup, especially in homes with hard water.
What Is a Dishwasher Water Inlet Valve and How Does It Work?
The dishwasher water inlet valve is an electrically operated solenoid valve that sits where the household water supply line connects to the appliance. It’s typically mounted on the lower front frame beneath the tub, though on some models it’s accessible from the side or rear.
When the dishwasher starts a cycle, the control board sends 120 volts to the valve’s solenoid coil. This energizes the coil, which pulls open a spring-loaded gate inside the valve body, allowing water to flow from the supply line into the tub. Once the machine reaches the correct fill level (monitored by a float switch or pressure sensor), the control board cuts power, the spring closes the gate, and water flow stops.
Most dishwasher fill valves have a built-in screen filter at the inlet port to catch sediment and prevent clogs. Over time, mineral deposits, debris, or simple mechanical wear can cause the valve to stick open, fail to open, or leak. Because the valve operates under household water pressure, usually 20 to 120 psi, even a slight failure can lead to overfilling, underfilling, or no fill at all.
The valve itself is relatively simple: a brass or plastic body, one or two inlet ports (single or dual fill), a solenoid coil, and internal seals. When it fails, replacement is almost always the correct fix, cleaning rarely restores proper function.
Common Signs Your Water Inlet Valve Is Failing
A failing dishwasher water valve announces itself pretty clearly. Recognizing the symptoms early can save time and prevent secondary damage, like water on the floor or a burnt-out motor from dry-running.
The dishwasher doesn’t fill at all. This is the most common symptom. The cycle starts, you hear the control board click, but no water enters the tub. Before blaming the valve, verify that the water supply line is open and that household pressure is adequate. If water flows freely when you disconnect the line, the valve is likely the culprit.
Slow or weak fill. The machine fills, but it takes much longer than normal. This usually points to a clogged inlet screen or a partially seized valve. Pull the valve and inspect the screen, if it’s packed with sediment or scale, clean it. If the valve still underperforms, replace it.
Water leaks from the valve or underneath the dishwasher. Internal seals can degrade over time, allowing water to seep out even when the valve is closed. You’ll often see pooling beneath the appliance or drips during the fill cycle. A leaking valve won’t fix itself, swap it out.
The dishwasher overfills or won’t stop filling. If the valve sticks open, water continues to enter the tub even after the float switch signals “full.” This can flood the base pan and trigger the anti-flood float, shutting down the machine. In some cases, you’ll hear water running constantly. Troubleshooting a dishwasher that won’t fill often starts with valve inspection.
Humming or buzzing from the valve, but no water flow. The solenoid coil is energizing, but the gate isn’t opening. This can indicate mechanical failure inside the valve body or low water pressure. Check your household supply first: if pressure is adequate, the valve is done.
How to Test Your Dishwasher’s Water Inlet Valve
Before ordering a replacement valve, confirm the diagnosis with a couple of quick tests. You’ll need a multimeter and about 15 minutes.
Check for power at the valve. Unplug the dishwasher or flip the breaker, then remove the lower access panel (usually two or three screws at the base of the door). Locate the water inlet valve, it’s near the supply line connection. Disconnect the wire harness from the valve terminals. Restore power and start a fill cycle. Use the multimeter set to AC voltage to probe the harness connector. You should read around 120 volts when the cycle calls for water. If you get voltage but the valve doesn’t open, the valve is bad. No voltage means a wiring or control board issue.
Test the solenoid coil resistance. Turn off power again. Set the multimeter to ohms (resistance). Touch the probes to the valve’s electrical terminals. A good solenoid typically reads between 500 and 1,500 ohms, check your model’s service manual for the exact spec. If you get an open circuit (infinite resistance) or a very low reading (near zero), the coil is fried and the valve must be replaced.
Inspect the inlet screen. Disconnect the water supply line from the valve (you’ll get some residual water, so have a towel ready). Remove the screen filter, it usually pops out with a screwdriver or needle-nose pliers. Hold it up to light. If you can’t see through it, sediment buildup is restricting flow. Clean it with white vinegar and a soft brush, then reassemble. If cleaning the screen doesn’t restore proper fill, the valve body is likely compromised.
Check for mechanical operation (optional, advanced). With the valve removed from the machine and connected to a hose, apply 120V AC directly to the terminals (use a short extension cord with bare wire ends, extreme caution required, wear insulated gloves). If the valve opens and water flows freely, then closes when power is cut, it’s working. This test is only for those comfortable working with live voltage.
Step-by-Step Guide to Replacing a Dishwasher Water Inlet Valve
Replacing the water inlet valve dishwasher component is a manageable DIY repair. Most valves cost between $20 and $50 depending on brand and model. Expect the job to take 30 to 60 minutes.
Tools and Materials You’ll Need
Tools:
- Screwdriver set (Phillips and flathead)
- Adjustable wrench or 3/4″ box-end wrench
- Needle-nose pliers
- Multimeter (for pre-testing)
- Towels and a shallow pan (for catching water)
- Work gloves
Materials:
- Replacement water inlet valve (verify model compatibility, check the appliance’s rating plate or service manual)
- Teflon tape or pipe thread sealant (if the valve uses compression fittings)
Removal and Installation Process
1. Disconnect power and water.
Unplug the dishwasher or shut off the dedicated circuit breaker. Turn off the water supply valve under the sink or at the appliance shutoff. Open the dishwasher door and remove the lower dish rack to access the base.
2. Remove the lower access panel.
At the bottom of the dishwasher door, remove the screws securing the kickplate or lower panel. Tilt it forward and lift it off. You should now see the water inlet valve mounted on the frame, usually on the left side.
3. Disconnect the water supply line.
Place a towel and shallow pan beneath the valve to catch residual water. Use an adjustable wrench to loosen the compression nut connecting the supply line to the valve inlet. Expect a few ounces of water to drain out. Replacing a dishwasher water inlet valve is simpler when you’re prepared for minor spills.
4. Disconnect the internal water line.
The valve has an outlet hose or tube that runs into the tub. This is usually secured with a spring clamp or hose clamp. Use needle-nose pliers to squeeze and slide the clamp back, then pull the hose off the valve. More water will drip, keep the towel handy.
5. Disconnect the wire harness.
Pull the electrical connector off the valve terminals. Some models use push-on spade terminals: others have a snap connector. No tools needed, just pull gently.
6. Remove the valve mounting screws.
Most valves are held in place by two screws threaded into the frame or a mounting bracket. Remove them and lift the valve free. Note the orientation, some valves are directional.
7. Install the new valve.
Position the replacement valve in the same orientation as the old one. Thread in the mounting screws and snug them down (don’t overtighten plastic brackets). Reconnect the electrical harness, making sure the terminals seat fully.
8. Reattach the internal water line.
Slide the hose onto the valve outlet and reposition the clamp. Squeeze it with pliers to ensure a tight seal.
9. Reconnect the supply line.
Thread the compression nut onto the valve inlet by hand, then snug it with the wrench. Don’t crank it, one full turn past hand-tight is plenty for a brass compression fitting. If your valve uses a threaded connection, wrap the threads with two or three turns of Teflon tape first.
10. Restore power and water: test for leaks.
Turn on the water supply slowly and watch for leaks at both the inlet and outlet connections. If all looks dry, plug in the dishwasher or flip the breaker. Run a short rinse cycle and observe the valve during fill. Listen for smooth operation and verify the machine fills to the correct level. Check beneath the unit one more time for any drips.
11. Reinstall the access panel.
Once you’ve confirmed proper operation and no leaks, replace the lower panel and secure it with screws. Replace the dish rack and you’re done.
Pro tip: If your home has hard water, consider installing an inline sediment filter on the dishwasher supply line. It’ll extend the life of the next valve and reduce mineral buildup on the spray arms and heating element. Detailed replacement walkthroughs often recommend this upgrade for long-term reliability.
Conclusion
Replacing a dishwasher water inlet valve is one of those repairs that looks intimidating but pays off in saved service fees and renewed appliance performance. With basic tools and a methodical approach, most DIYers can knock it out in an afternoon. Keep the old valve as a reference for sourcing the correct replacement, and don’t skip the leak check, catching a drip early beats mopping up a flooded kitchen later.